In keeping with tradition, I had to have an advent calendar. My mom had one. Hers was from the Current catalog, and she probably might have picked something a little more substantial if she realized how long she would be doing it. It was a chimney and the bricks were made of 24 little paper boxes. Every day, a box was opened and something fun was inside. Christmas socks, candy, a note that hinted to a fun adventure later that day. Since there were 4 kids, we each opened our own box every 4 days. And maybe, just maybe, there were some occasions when Mason and I slid out the boxes to snoop at our upcoming surprise. Mom was sneakier. She didn't do anything the until the night before. (Of course now I see that she just probably had one day at a time figured out- just like me.) We looooved our "boxes" and Mom even continued the boxes while I was in college- either mailing me little gifts or waiting until I came home from break and having a bunch of days for me all in a row. Eventually, we all got older and moved out (and in some cases, moved back) and the boxes got put away. Those little things were squashed and torn and had been loved for years!
I knew I had to have an advent calendar. And there were some precious ones out there!! Pottery Barn had an adorable one a few years back. I was going to make one out of little boxes and magnetize them and have a cookie sheet... Big plans. But with have two littles under 2 and didn't have the motivation/time/energy. Thanks to Pinterest, I was already defeated before beginning- too much inspiration!! :)
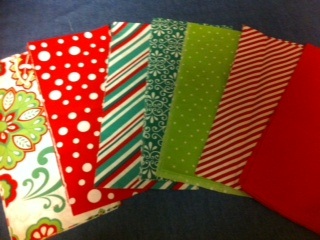
During Thanksgiving, my sister, Molly, insisted we make one. We went to Micheal's, picked out the fabric and stayed up late making it a couple of nights. Turned out pretty cute!
Basic steps- sorry, no great tutorial. Uploading pics is taking FOREVER!!! You need to know that we love to craft but our sewing skills, measurement skills- heck, most everything needs work. Our mantra was "That's fine." So- for all you Anal Annies, or Perfectionist Paulas- you might want to skip my directions. (Eww- Anal Annies sounds so gross.)
1. Buy a variety of fabrics. You'll need about a yard for the background and 6-8 different fabrics. The least Micheals will let you cut is 1/8 of a yard, which is enough for 3 or 4 pockets. Our fabric total was about 10 bucks because most was on sale. Most of the patterned fabrics were 44 cents!! The denim background only cost 99 cents, which HAD to have been a mistake but there were 8 people in line for Blanca to cut their fabrics after me, including one VERY serious quilter, and I didn't want to make anyone mad.
 2. Iron your fabrics and make the little pockets. I used a piece of cardboard to make sure they were all the same size. We ironed inside out and then folded the top flaps down. The just used the sewing machine to hem the front and back and then zipped right up the sides. Very simple pockets.
3. Lay out all the pockets in the order you want them.... This was kinda like one of those move-one-square-at-a-time puzzles until the picture is finished. Super frustrating to me, because I would get it all arranged and then step back and have a row of all polka dots.

4. Pin the background to fit with some space around the pockets and hem it up.
5. We added ribbon to the tops of all the pockets. We used fabric glue right on top of the stitching in the front and wrapped it around the back, pinning it until it was dry.
6. The pockets were just tacked on in the top right and top left corners. We figured that was so they could hold something bigger without as much bulging. Plus, it was 11:30 and we wanted to go to Black Friday sales at Wal-mart. Big mistake. Crazyville.
5. I made little tags using my Silhouette machine. Cut out the numbers using the font Impervious onto glittery green vinyl. I cut the circle tags with the machine, too. I used a red stamp pad to make a ring around the tags and added the numbers to each one. (I used Press-N-Seal to transfer my vinyl- it worked great! ) Punch a hole, string it up with yarn. Tada!


6. I just pinned the tags on the inside of the pockets with safety pins. For one, I'm not crazy about the tags and if I'm out to Micheal's or Hobby Lobby, I'm going to look for something I like more. Just couldn't make myself drive into SA just for tags.... I also added some ribbon at the top, but don't love it, either.... A work in progress.

Basically, I had to get it up and finished because we start it tomorrow. I have already learned I need to have it up higher. Pocket 23 is full of raisins and #19 is holding Barbie's shoes. I like that I can add more to it later- thinking ric-rac and jingle bells.
Love it for now. And especially love that it's finished.
No comments:
Post a Comment